Tuesday, March 31, 2009

Squee!


A last-minute socktopus for my friend's baby's birthday. They invited me to dinner on Monday night, and I knit the whole thing on Sunday (it did take longer than I thought; I was up pretty late Sunday night).


Were I to knit it again, I think I'd do paired right- and left-leaning increases and decreases for some symmetry. I'm not super fond of the way those increases swirl across the top of the head.


The thing is even cuter than I thought it would be! Those tentacles were a little fiddly to knit, but so worth it! Just look at those adorable socks.

Wednesday, March 25, 2009

FO: Shalom


Here are some more composed pictures of the Shalom cardigan, taken in the sober morning after my wearing it out immediately upon being (almost) dry yesterday. You may notice that the sleeve is a little wrinkled, from my bending my elbow last night at choir rehearsal.


A little difficult to catch the color in this light (barn-red-rust-brown-orange is almost as hard to photograph as red, it turns out). This striped-with-window-sash pic comes closest to getting it. Looking at that length laid vertically, the thing looks really cropped and boxy, right? Hard to believe that it gets weighed down enough by its own weight to be pretty much the same length as all my other sweaters.

The yoke is just gorgeous, and the short rows I worked in the back do the trick in hiking up the back of the collar just a bit. I would probably work a few more were I to do it again. I used some vintage buttons I bought a few years ago at antique show; they match quite nicely and I think give the sweater a nice old-fashioned look:


In the end, since following my gauge (5 st./in.) mods of Ishi's mods didn't work perfectly for me, here's what I did. I placed markers, rather than dividing, right after the last garter ridge: right front 43 stitches, sleeve 51 stitches, back 72 stitches, sleeve 51 stitches, left front 43 stitches.

Then I knit to the center of the back (36 stitches in) and marked it, and worked short rows as follows: knit to 10 st. past marker, wrap and turn, p to 10 stitches past marker, wrap and turn. Knit to 15 stitches past marker, knitting into wrap with wrapped stitch when I encounter it, wrap and turn. Purl to 15 stitches past marker, purling into wrap with wrapped stitch when I encounter it. Repeat these steps, each time going 5 more stitches out, until I've gone as far as 25 stitches from the marker on both sides of it. Were I to do it again, I think I'd go to 30 stitches past the marker. I did it this way, rather than working my short rows in from the furthest-out point, because I am not super-great at picking up wrapped stitches and I feel like you can always notice them, so I tried to hide them all right underneath the last garter ridge.

Then I went on with the body, dropping that center-back marker. I increased every other knit row inside both sides of just the sleeve markers, the way I would have for a raglan increase, but only in the sleeves. I did this 3 times, for an increase of 6 stitches inside each sleeve. Then I worked regular raglan increases (increasing on both sides of each marker) every other knit row twice. At that point, I was at an armpit length that seemed more reasonable, so I divided for the sleeves. Since I had increased 2 stitches on each side of the armpits, I only had to cast on 11 stitches under each arm as I separated for the sleeves. Were I to do it again, I think I'd have cast on fewer than that, because this sweater is a little too big, and because those cast-on armpits are kind of noticeable when you're wearing the sweater. I think maybe 5 or 7 would have been more reasonable. I also think the sleeves are a bit too wide, so cutting back the cast-on for the sleeves would not be terrible.

I left the body stitches on a holder after a few rows and worked the sleeves; I think this was a great idea, because it helped me avoid second sleeve syndrome. I worked the sleeves in the round using magic loop, and decreased on each side of the center stitch picked up under the arm at the 4th round, the 21st round, and every 14th round after that. I knit them until they were about 11 inches long, then worked a decrease row, decreasing every 8th stitch, then worked 12 rows of garter and bound off. I wanted my sleeves to be a little boxy and not too close-fitting at the elbow.

For the body, I just worked straight to (what I thought was) the right length, working a slipped-stitch "seam" under each armpit all the way down, then decreased every 10th stitch, worked 12 rows of garter and bound off. A proportion of garter to stockinette of 90% seems perfect for not flaring out or pulling in. After blocking, of course, I realized it was much too long and ripped back about 20 rows of stockinette, then reworked the garter hem.

Tuesday, March 24, 2009

Shalom!


Shalom turned out quite nicely, I think! I snapped these pictures as I was heading out the door -- they're not very good, but they give a general idea.


Aurora 8 is VERY stretchy -- I ended up having to rip back about 5 inches of the hem after blocking because it grew and grew. Thankfully, the growth seems mainly to be in length, because this is just a tad too big. Perhaps Paula would like it, and I can make myself another. But soft, comfortable, kicky -- I think this will get a lot of wear!

Monday, March 23, 2009

Two FO's and a work in progress

The Shalom Cardigan is finished and blocking at the moment. It turned out well, with only a slight degree of panicking over growing superwash yarn during the blocking process. Modeled photographs are forthcoming.

In the meantime, here is a picture of a long-finished knitting project: the cashmere OX cable scarf I knit my boyfriend for Christmas. Begrudgingly modeled (but not begrudgingly worn) by the man himself.


I'm partial, but I think he bears a slight resemblance to the sexy Severus Snape. This photo was snapped during a walk this Saturday, a truly glorious day that led me to do a little sightseeing in my neighborhood:


Ah, scraggly weeds and the Henry Hudson Bridge. Gotta love NYC.

Saturday, March 21, 2009

Correction.


Silly me. I forgot that a big change in stitch gauge would entail a similarly big change in row gauge. There was no way this puppy was going to reach under my armpits at the bottom of the yoke ribbing. Luckily, I was planning all along to make it a sweater with sleeves, so it's all good. I incorporated a few raglan increases to cut down on the number of stitches cast on under the armpit, and viola: a Shalom-esque sweater rather than a Shalom.

I think it's still cute, though I liked the nice, neat way that the real Shalom's yoke ended just as the body/sleeves divided. Alas. Next time I won't be such a smart-aleck and will just knit something in the right gauge of yarn.

That said, I love, love, love this yarn (Karabella Aurora 8) -- the color and the feel. I worry, though, both that it will grow out of control and that it will become pilly. Those two problems have plagued me as long as I've been hard-headedly knitting things with soft yarn even though everyone says that soft yarn pills and that superwash grows...

Monday, March 16, 2009

four blobs


As schoolwork and other obligations piled up over the last few weeks, all I've been able to think about has been knitting. But spring break is here, baby, and I can finally do all that knitting I've been jonesing for!


Today, officially the first day of break, a package arrived from Webs with two lovely blobs in it: Dream in Color Classy in Dusky Aurora and Chinatown Apple. The Dusky Aurora is destined to be an Adult Surprise Jacket for my mom, with some modifications to make it look a little more like a boxy Chanel jacket than a lab coat. The Chinatown Apple, I don't know. Something for myself, I believe. I'd say a February Lady Sweater, but in fact I already have one of those blobs on the needles:


The periwinkle bed jacket for grandma was so successful that I've started my own in Jo Sharp Classic DK -- the gauge is different from the original though (5.5 stitches per inch), which means that I am using the medium measurements to knit an XXS. That's on hold for a bit, though, for two reasons: the first is that I accidentally pulled out the needle from about 30 stitches and am going to have to steel myself before I look at the damage to the lace pattern; the second is that I have to concentrate on the lace, so I am saving it for mindless TV knitting. (I mean, knitting in front of mindless TV, not mindless knitting in front of the TV.)

But spring break also means fun reading, and the book I checked out of the library -- Jeffrey Eugenides's Middlesex -- is so interesting that I want to read it all the time. So I've cast on a Shalom Cardigan, which has a yoke that needs concentration, but a totally mindless body. Once the yoke is done, I'll have nothing but stockinette in front of me, and I can read and knit to my heart's content. That will be in exactly 3 rows. The fourth blob:


Of course, this is also not the same gauge as the original (5 stitches per inch instead of 3.25), being knit in Karabella Aurora 8, so I've had to make some modifications. In case you're interested, they are to cast on 101 stitches, have 7 stitches in garter for the button band, and to do the increases as written. At the end of the third increase row, it works out to 253 stitches. Doing the math on Ishi's modifications (Ravelry link), I need to add 7 more stitches somewhere in the last garter ridge for a total of 260 stitches, and I'll be able to do the following:

Right front 43 stitches, sleeve 51 stitches, back 72 stitches, sleeve 51 stitches, left front 43 stitches. I'm going to put all but the back stitches on holders and work 8 rows of stockinette along the back to hike up the collar a bit, then I'll cast on 15 stitches for the underarms and work the body (total of 188 body stitches), then for the arms, pick up 15 stitches along the cast-on edge and 6 more along the side edge of those 8 rows, for a total of 72 arm stitches. Here's hoping it works out! Of course, Aurora 8 has a reputation for stretching, so I am hoping that my worries about this sweater's being too small will be resolved in blocking. I am, this time, using a blocked swatch, having been burned with growing, multi-ply superwash yarn in the past.

By the way, I am pleased as punch with both the Jo Sharp Classic DK and the Karabella Aurora 8. I've knit with the Karabella before, but not the Jo Sharp. Both are hardy, well-made yarns, but totally different from one another. The Aurora 8 is heavy, bouncy, super springy, and absolutely not itchy at all. That's why I'm hoping it will knit up into a nice, close-fitting, stretchy sweater that I can wear even in the summer. It would have been a terrible choice, however, for the February Lady Sweater, whose lace pattern would have gotten all stretched out of shape with that much weight pulling it down. The Jo Sharp yarn is much lighter and more rustic, and wooly enough that I don't think this will work up into a seasonless sweater. However, I have high hopes for its being a perfect, mulitpurpose, super-warm and hard-wearing winter sweater, and I know its lighter weight won't pull the lace out of proportion.

Hooray for spring knitting! Even if it does result in sweaters I can't wear for months!

Saturday, March 7, 2009

millinery


Here's a little tidbit I made up to go along with the tulip cardigan. The parents of this baby are supposedly not into frou-frou girly things, so I tried to come up with a hat that had some flexibility. On the one hand, the cardigan seems to call for a 30's-style cloche or helmet, which of course needs an oversized, stylized flower. On the other hand, frou-frou-free parents may object to the flower. Hence the solution:


A removable flower. If they want this baby to sport a pared-down, tailored hat, they can, and if not, they can attach the flower for some frou.

Here are the specs:

Sizes: 3-6 (6-9, 9-12) months
Gauge: 6 stitches and 8 rows/inch
Needles: size 3 16" circular, size 3 double-pointed
Requirements: less than 100 yards sport-weight yarn each in colors MC, A, B, C; tapestry needle; one large-ish button.


With circular needles, cast on 84 (88, 92) stitches in brown (color A). Being careful not to twist, join to knit circularly, and work 4 rounds of k1, p1 rib. Break yarn and join tan (color C). Knit one round. Break yarn and join green (MC). Work 2 inches in seed stitch (*k1, p1 in round one, *p1, k1 in round two), adding one stitch at the end of the first seed stitch round so that you can just mindlessly go around and around over an odd number of stitches. Break yarn and join tan (color C). Knit one round. Break yarn and join brown (color A).

Work in stockinette (all knit) until piece measures 4 (5, 5) inches. In next round, decrease by 1 (increase by 2, decrease by 2) stitches randomly in round to get a multiple of 7 stitches. 84 (91, 91) stitches. In next round, place a marker after every 12th (13th, 13th) stitch. In the next round, begin decreasing as follows:

Round 1: *k to 2 stitches before marker, k2tog, rep from *
Round 2: knit.

Repeat these two rows until there are six stitches between each marker. Switch to double-pointed needles when it gets too tight. Then work decreases every row instead of every other. When there are 2 stitches between each marker, break yarn and thread through all stitches, dropping markers as you do so. Pull tight to draw together stitches.

Weave in ends and block. Sew one pretty large button to center of green band, at a jaunty place on the side of the hat.

Flower:

With double-pointed needles, CO 68 stitches in pink (color B). Join carefully to work in round, being careful to avoid twisting. Work in stockinette (all knit) until work measures 1.5 inches. K2tog across round, break yarn, and thread through all stitches. Pull to draw together, but leave a big enough hole in the middle to fit around your button. Knot yarn to keep from loosening up again, weave in ends and block.

Button flower to hat and enjoy!

Monday, March 2, 2009

Snow day!


No school today; it's been snowing like a mofo here in NYC. I woke up this morning (at the blissful hour of 10 am) to these views out my fire escape and living room window:


Snow days are so nice! Unfortunately, I can't just laze around the entire day, because I have 36 student papers on Hamlet to read. However, I can take a moment to report on some knitting progress and a new free pattern!


First of all, the red striped socks were finished in time for Paula to wear them home after her visit last weekend. They look great on her, and she reports that they are quite warm.


Then, the tulip yoke cardigan is all finished, and I am pleased to offer it is a free pattern, here on my website and as a Ravelry download (see previous post). Enjoy!

Tulip Yoke Baby Cardigan pattern


Just in time for in-like-a-lion March weather, here's a free baby cardigan pattern with spring colors of mud and grass and a line of cheerful spring tulips!

This is a top-down, circular yoke cardigan in three sizes (3-6, 6-9, and 9-12 months), with instructions on how to increase for the yoke, separate for the sleeves, and pick up stitches for button bands. It's a great pattern to try if you are a first-time sweater knitter!

Also avaliable as a free Ravelry download here.
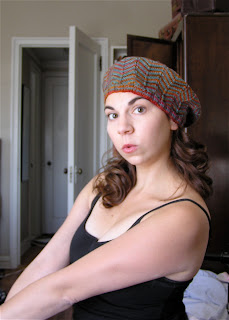
Matching hat available here.

Note: There was one row missing from the yoke instructions. All increases should be worked in knit rows. Pattern has been amended 7/3/09.

Tulip Yoke Baby Cardigan Pattern

Sizes: 3-6 (6-9, 9-12) months. Shown in smallest size.
Finished Measurements: 20” (21”, 22”) chest circumference

Gauge: 6 stitches and 8 rows = 1” in stockinette

Requirements:
Circular or straight needles, size 3
Double-pointed needles, size 3 (optional)
Sport weight yarn (I used Knitpicks Shine Sport): MC (300-450 yards), secondary colors A (less than 100 yards), B, and C (less than 50 yards each)
Two stitch holders or pieces of scrap yarn
Tapestry needle for weaving in ends
6-8 matching buttons

MC=green (I used “leapfrog”)
A=brown (I used “fedora”)
B=pink (I used “terracotta”)
C=tan (I used “willow”)


Note: this is a top-down circular yoke sweater; it begins at the neck ribbing. It does make use of flat fair isle knitting for a brief section of the sweater (14 rows total), so be warned if flat fair isle knitting is something you hate!

Special instructions:

Complete abbreviations glossary at end of this document.

m1 (make 1): my favorite way to make a stitch is to lift up and knit the right leg of the stitch one row below the stitch on the left needle. Another option is to pick up the bar between stitches and knit it through the back loop.

Reading the charts: pattern repeat is marked in red. For the tulip chart, one or two extra stitches are included next to left and right button bands to make the pattern symmetrical. The tulips are upside-down because the knitting will be done top-down. The fair isle pattern for both charts begins with a purl row.


Directions:

Yoke
With MC, cast on 79 (79, 85) stitches. Work 7 rows of k1, p1 ribbing. Work one row purl. Switch to A and work two rows stockinette. In next row, increase 16 (16, 20) stitches evenly across row as follows: k2 (2, 4), *m1, k5 (5, 4), rep. from * 14 (14, 18) times, m1, k2 (2, 5). 95 (95, 105) st. Work 1 more row stockinette. In next row, increase 28 (28, 28) stitches evenly across row as follows: k7(7,12), *m1, k3, rep. from * 26 (26, 26) times, m1, k7 (7, 12). 123 (123, 133) st.


In next row (WS), join B and begin working tulip chart. You will work 12 (12, 13) repeats of the tulips. Remember to work the extra stitch or two at the beginning of first repeat and end of last repeat to center the design on yoke. After row 10 of the tulip chart, work one row in color A, then in the next row increase 28 (28, 28) stitches evenly across row as follows: k8 (8, 13), *m1, k4, rep from * 26 (26, 26) times, m1, k7 (7, 12). 151 (151, 161) st. Work 3 rows stockinette (in color A). In next row, increase 17 (17, 19) stitches evenly across row as follows: k3 (3, 4), *m1, k9, rep. from * 15 (15, 17) times, m1, k4 (4, 4). 168 (168, 180) st.

In next row (WS), join C and begin working zigzag chart. You will work 42 (42, 45) repeats of the zigzags. After row 4, work one row stockinette in MC, placing markers as follows: p24 (24, 26), place marker (pm), p36 (36, 38), pm, p48 (48, 52), pm, p36 (36, 38), pm, p24 (24, 26).

In next row and following 5 (7, 7) RS rows, work raglan increases: *k to marker, m1, slip marker, m1, rep. from *, k to end. 216 (232, 244) st.

Body
In next RS row, divide for sleeves as follows: knit to first marker, place stitches between first and second markers on a holder or piece of scrap yarn, knit to third marker, place stitches between third and fourth markers on a holder or piece of scrap yarn, knit to end. You can drop the markers in this row. Continue body in stockinette until it measures 9½ (10½, 11½) inches from cast-on. Then work 12 rows of k1, p1 rib and bind off.

Sleeves
Place one sleeve’s stitches back on needles and rejoin MC yarn. Work back-and-forth or in the round. If you work back-and-forth, cast on one selvedge stitch at each side to use for seaming up later. Work 12 rows stockinette. In next row/round (RS), k1, ssk, work to 3 stitches before end, k2tog, k1. Work 11 more rows/rounds. Repeat these 12 rows/rounds 3 more times. Work 0 (4, 8) more rows/rounds stockinette. Sleeve should be 6 (6½, 7) inches from armpit. If it is not, continue in stockinette until it is. In next row/round, *k4, k2tog, repeat from * to end. Work 8 rows k1, p1 rib and bind off. Repeat with other sleeve.

Buttonhole bands
Pick up 3 stitches for every 4 rows along left front cardigan edge for button band. Work 8 rows k1, p1 rib and bind off. Pick up same number of stitches along right front cardigan edge. Work 3 rows k1, p1 rib. In next row, work eyelet buttonholes in the places you would like them (make an eyelet buttonhole by working up to the place you’d like the buttonhole, then YO, k2tog, and continue to the next spot you’d like a buttonhole). Work 4 more rows k1, p1 rib and bind off.

Finishing
Weave in ends, block, and sew on buttons!


Abbreviations used in this pattern:

k: knit
k2tog: knit two stitches together
p: purl
pm: place marker
rep from *: go back in this line of instructions to the *. Repeat the instructions from the * to the end of the line as many times as specified.
RS: right side (usually knit side)
ssk: slip the next two stitches as if to knit, then knit them together through the back loops.
st: stitches
WS: wrong side (usually purl side)
YO: yarn over (move yarn to front of needle as if to purl, but knit the next stitch, making a loop where the yarn went over the needle.


Copyright 2009 by Jennifer Little of Looking Glass Knits. Please do not sell this pattern or sweaters knit for it for your own profit.