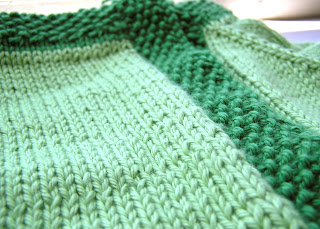
The body of the new baby sweater is finished, and I'm picking up stitches along the fronts for the button bands. I thought I'd stop and take some pictures and do a little tutorial for any of you readers who have never picked up stitches for button bands (or other things, for that matter) before. You can click on any of these pictures to see a much larger image.
If you look carefully at your cardigan fronts, you'll see that between each column of stitches is a little ladder of yarn that makes a column of little holes. The column of holes you want to work with is the one between the very first column of stitches of your cardigan front and the column of stitches next to it.
Hold your work so that the right side is facing up and the button band is closest to your chest (your columns of stitches will be running sideways). Tie your working yarn to the back side of the work at the very right edge of the front. Poke the tip of your needle into the first hole (the one farthest to the right) in the column you were just looking at, from the front side into the back side. In the photo below, I've already picked up some stitches, but the process is exactly the same:
Here is what it looks like from the back side of the work:
Wrap your working yarn around your needle the way you would wrap the yarn if you were making a stitch.
Pull the loop of yarn you just wrapped around the needle from the back side into the front side of the work.
As you are picking up stitches, you are going to need to skip a hole every once in a while, because rows are shorter than stitches are wide. (Recall that gauge is sometimes given for stitches and rows, and it will say things like "5 stitches and 7 rows = 1 inch.") In this case, I need to skip every fourth hole.
When you get to the end of your cardigan front, you will have a whole bunch of loops of yarn on your needle, ready to turn and work just like regular knitting!
Saturday, June 20, 2009
tutorial: picking up stitches
Posted by
Jen
at
10:24 AM
1 comments
![]()
Labels: baby clothes, cardigan, fair isle, february baby sweater, original designs, stranded, techniques, top-down, tutorials
Thursday, June 11, 2009
Adorability
Progress on the new baby sweater continues. I'm quite pleased both with how nice it looks (with the ends all tucked in on the front) and with how little yarn it seems to be taking up -- I had planned for three balls of Knitpicks Essential Kettle-dyed (the old 50g balls), but I think it will squeak in with just two. Sweet! And the yoke is all done with scraps, so for the price of a pair of socks, I get a baby sweater!
Meanwhile, I have discovered the joys and dangers of Etsy. It's an awesome, awesome site. The problem for me is not that I go on Etsy and order tons of handmade things, but that I go on Etsy and look at beautiful handmade things, and think, "I could make that!" Hence, the huge pile of designer fabric scraps and lots of zippers:
None of which I really need. But I did make some cute things today! Here are two little coin pouches.
I learned how to make a fully lined zippered pouch. I have not yet learned how to make it perfectly straight, but I'm getting better. I made the orange one first, and then the pink one, and I think the pink one is straighter. I also don't know how to make square top corners, and though I don't dislike these sort of "mitered" ones, I'd love to know if there is indeed a trick to squaring them.
Do I need these things? No. But they are cute. Did I spend $25 on zippers alone? Yes.
Then there's this little buttoned metrocard holder. This one I actually kind of do need, because I am constantly losing metrocards with like $40 on them. The plan is that a slightly bigger holder (that's super cute) will keep me from dropping the card in my pocket where it will slide out again. It's adorably reversible (and also definitely not square):
Also adorably reversible is this little purse for the two-year-old older sister of the baby who's getting the sock yarn sweater:
I'm a little disappointed with the strap -- it just looks kind of clunky. I also didn't really measure the buttonhole tab, and it's a little too long. But the combination of fabrics is really sweet. And the best part is this:
She loves playing with wallets and taking credit cards out of them, so I made her her own little wallet, with a few old cards of mine. So sweet!
Yes, I may have lost my mind. Adorable fish-print-induced mania!
Posted by
Jen
at
1:33 PM
2
comments
![]()
Labels: baby clothes, cardigan, fair isle, february baby sweater, original designs, sewing, socks, stranded, top-down, yoke
Tuesday, September 30, 2008
What I've been doing instead of grading papers.
Exhibit A:
An unblocked sock. The second in my set of socks for Sarah for Christmas. This one is top-down, eye of partridge heel, very standard-issue -- but not for me, because it is only the second pair of socks I've ever made.
Exhibit B:

The sleeve of my long-neglected fair isle yoke cardigan. This one has been long neglected for two very good -- and one medium good -- reasons. The medium good one is that it has a tiny gauge. The two very good ones are first, that I started knitting it before realizing that I was twisting my purl rows, and since learning this I've become a much faster knitter when doing it correctly, and it's irksome to have to keep knitting this the old (wrong) way; and second, that I made the armholes too big when I was knitting the body, and I didn't know what to do to fix this problem. I didn't want just to rapidly decrease as I started knitting them, because that would make them have a funny shape, and in my opinion the most crucial part of a sleeve is the part where it hits your shoulder -- it can make your arm look either fat or skinny. So I came up with this ingenious scheme, which I think worked awesomely. The pit:
 (for some reason, this seems like an obscene angle from which to take a picture). I ascertained that there were about 10 stitches too many in the arms as I picked them up to start knitting down, so I kitchenered together four stitches from each side of the arm, leaving the last extra stitch on each side for selvedge when sewing the arms up. Here's a closer detail shot:
 That kitchener stitch is executed very poorly, but it's an armpit, for cripe's sake.
Exhibit C:
 A gorgeous chevron beret that is, alas, too small, I fear. This is a mid-blocking shot, and I was only able to squeeze it onto a medium-sized dinner plate -- about an inch in diameter smaller than the one on which I blocked the first chevron beret. I have plenty of Imagination yarn left over, so I can just knit a new one if it is too small, but it's a disappointment nonetheless.
Exhibit D:
 The beginnings of a February Lady Sweater for my grandmother. Despite my manifold qualms, I am knitting this in Debbie Bliss Cashmerino Aran. Yes, it is already beginning to pill, but she is very picky about softness. It may not be evident in this picture, but I decided to make the yoke circular as in the original, and to start the lace pattern early instead of knitting garter to an inch before separating for the arms, because I'm knitting this as a bed jacket for her and I think that the circular, shorter yoke looks more like old-fashioned bed jackets.
Exhibit E:
 I reorganized my yarn stash. I was beginning to fear moths, so I packaged it all up neatly in Ikea boxes and zipper bags and put it neatly in the bottom of one of my new bookshelves.
 Pretty nice, eh? This project renders relatively obsolete my old system of organization:
 I may have gotten a little obsessed in the process of putting everything in zipper bags. Here's my basket of UFOs:
 All neatly piled in order of what's next to work on.
Yes, I really, really did not want to grade those papers.
Posted by
Jen
at
3:14 PM
10
comments
![]()
Labels: beret, cardigan, chevron, fair isle, february baby sweater, finishing, grad school, hat, original designs, procrastination, raglan, school, socks, stash, stranded, sweater, top-down, yoke
Thursday, July 10, 2008
Projects completed and imagined
After learning that a college friend just had a baby girl, I finally got it together and finished what I'm calling my Faux-bruary Baby Sweater, because I didn't have the pattern and made it up as I went along, therefore not realizing that I was supposed to majorly increase in the armpits for both body and arms. However, I think that the sweater looks pretty much like the original:
Sorry about those dark window sash shadows. I didn't bother putting in buttonholes, and instead used snaps, reinforced on the inside with cheap buttons and concealed on the outside by some vintage buttons I bought last summer at an antique show. To complete the whole vintage-y ensemble, I made a really easy bonnet.
When I say easy, I mean easy. I just did a square of nine repeats of the gull stitch pattern framed by 4 garter stitches on the sides and 4 garter ridges on the bottom, putting an eyelet 2 stitches in from the edges after the first 2 garter ridges and every second lace repeat thereafter. After 4 inches, I did some unnecessarily fancy decreasing in something approximating the lace pattern (but next time I think I'll just switch to garter at that point, then switched to garter and decreased 7 stitches every other row until the thing was like 8 stitches, then ran the yarn through the stitches and knotted it. I wove a ribbon through the eyelets to make a tie. As usual, I have no idea how big a baby's head is, so I eyeballed it -- the kid might be wearing the two parts of this outfit at two totally different times in her life ...
Meanwhile, a shipment from Knitpicks just came in, with four colors of their new "Imagination" sock yarn. I really have enough projects in the hopper already, but I just had to get some of this yarn when I saw that one of the colorways was named Looking Glass! And then, of course, I had to get a few more colorways while I was at it...
From left to right, these are Wicked Stepmother, Seven Dwarves, Frog Prince, and Looking Glass. As usual with Knitpicks, the colors look significantly different in person and on the website. The worst offenders in this instance are Wicked Stepmother and Seven Dwarves, which looked sort of muted and sweet on the computer screen but are in fact quite bright and blaring. The other two look pretty much the same as on the website. In fact, though I was worried that Looking Glass would not actually be a color I'd like, it turns out to be the nicest in the bunch, I think. I'm planning to pair these babies up and make some more chevron berets for Christmas presents, since I so enjoyed making the first one. I'm banking on the mixing of the colors doing wonders for the brightness of the two bright ones -- after my first beret I was surprised how different the yarn looked in the skein and knitted up.
But that will all have to wait until I clear out some of my other unfinished objects...
Posted by
Jen
at
1:03 PM
2
comments
![]()
Labels: baby clothes, beret, cardigan, chevron, EZ, february baby sweater, hat, top-down, yarn, yarn reviews, yoke
Monday, June 2, 2008
Two saints down...
... and only one to go. Still feeling the end-of-term doldrums, but I'm slowly, slowly nearing the finish. At least the essay I am allegedly working on right now is a bit more in my field, being only half about a saint and half about a book...
Meanwhile great progress has been made, frogged and made again on the knitting front. I got the front bands done on the green peach blossom jacket, and am on a sleeve hiatus while I decide whether I have enough dark green yarn for both sleeve hems and i-cord closures, or whether I need to rip out the hem facing on the bottom and redo it in lighter green to conserve dark green yarn. That's a project that's destined to be done in front of the TV, I think, and too fiddly to knit on the subway, which is what I've been doing lately.
That barely-discernible fair isle sweater has been frogged (actually the second time I've frogged something partially-knit with this same periwinkle Baby Cashmerino), and I finally cast on something I'm happy with:
A February Baby sweater, a la EZ, only I was too lazy to go out and buy the book with the pattern, so I eyeballed it after briefly consulting a million project pictures on Ravelry and looking at Google Books (which will display only the second page of the Baby Sweater on Two Needles pattern). But, being me, I had to resize the whole thing, going for 26 instead of 20 pattern repeats on the body and casting on 56 stitches instead of 40. As other people have noticed, the yoke does seem to start too small and increase a bit too quickly -- were I to do it again I would start with a few more stitches and increase a little more slowly to keep its angle more in line with that of the rest of the sweater. Meanwhile, since I didn't actually consult the pattern so much as fake it, I did not realize that I should have cast on an extra two (?) pattern repeats under each armpit as I was dividing for the sleeves. I think, in fact, that the body looks perfectly fine the way it is, but I need to jerry-rig something now as I start the first sleeve. I'm thinking of just casting on another pattern repeat's worth of stitches and going with it -- the sleeves will still not be quite as wide as EZ's originals, but I think they will be fine.
I think it's perfectly clear what I have been expending brainpower on this week, as I claim to be working on papers...
However, honestly, this was the quickest-knitting, most fun baby sweater I've ever made. I did the whole yoke and body over the course of, I think, three trips to and from Lower Manhattan or Brooklyn in the last few days. Of course, each time I packed up stuff to entertain myself on these subway rides, I did diligently load like 3 articles and a book into the backpack as well... where they stayed, while I knit...
Posted by
Jen
at
12:09 PM
1 comments
![]()
Labels: baby clothes, cardigan, EZ, february baby sweater, original designs, peach blossom, procrastination, ravelry, reading, school, sweater, top-down


