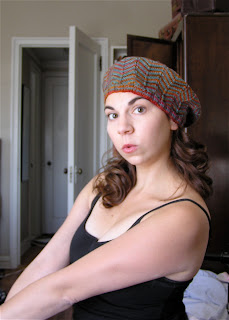
Just in time for Halloween, here's a pattern for you (I've been sitting on it for quite a while, but the publication I sent it to didn't pick it up):
Dante Alighieri is famous for writing the Divine Comedy, the story of his trip to Hell, Purgatory, and Heaven, but he’s just as well known for his iconic headgear: every picture of Dante ever painted depicts him in a droopy medieval “sack hat” worn over a white skullcap with earflaps whose cords he lets dangle in a devil-may-care (pun intended!) attitude. Sometimes Dante is also shown with a poet’s laurel wreath atop this hat.
Since I couldn’t find a Dante hat for sale on a recent trip to Florence, I decided to make one of my own, complete with intarsia laurel wreath and dangling earflaps. Real medieval sack hats were just tubes of fabric drawn together at the end, but I gave mine a little shaping at the top so that it would lie the right way and not fall down over the eyes. Since the stranding and the addition of earflaps already added some bulk, I opted for attached i-cord ridges to imitate a folded-up brim without the doubled fabric weight. The result is, I think, not just a delightful costume element but also an attractive hat for everyday wear.

SIZE
S [M, L] (shown in size S; sizes are extremely customizable). Size S fits teenage children and small-headed women; size M fits large-headed women and small-headed men; size L fits large-headed men.
FINISHED MEASUREMENTS
Circumference: 18 [20, 22] inches
Length: 11.25 inches
MATERIALS
Karabella Aurora 8 [100% merino wool; 98 yd/90 m per 50g skein];
[MC] #7223: Burgundy; 2 [2, 2] skeins
[A] #7767: Sage; 1 [1,1] skein
[B] #1364; Oatmeal; 1 [1,1]
1 set US #8/5 mm double-point needles
1 set US #8/5 mm straight needles (optional)
16 inch-length US #8/5 mm circular needle
24 inch-length US #8/5 mm circular needle
Stitch markers
Tapestry needle
GAUGE
16 sts/26 rows = 4" in stockinette stitch
PATTERN NOTES
Attached i-cord: tutorial can be found here.
Provisional cast-on: tutorial can be found here.
Three-needle bind-off: tutorial can be found here.
Sl1-k2tog-psso: slip one stitch, knit the next two stitches together, and pass slipped stitch over this stitch.
PATTERN Band
In MC, CO 17 st using provisional cast-on.
Row 1: k8, join yarn A and k1 with A, k8.
Laurel wreath pattern, first half:
In stockinette stitch, work the setup rows for the laurel wreath, following the chart. For size S, work 3.5 repeats of chart (there should be four leaves on each side of the wreath). For sizes M and L, work four full repeats of the chart (there should be four leaves on one side of the wreath and five on the other side). Finish laurel wreath with the appropriate branch tip, depending on which side of the wreath your final leaf is on.
Continue in stockinette stitch in MC for 5-10 more rows. This is where you can customize the size of your hat: work a few rows past laurel wreath pattern, then hold band up to your head or the head of the person for whom the hat is intended, stretching it somewhat for a close fit. When band seems to reach halfway around your head, count the number of rows past the laurel pattern, knit this same number of rows, and move on to the second half of the laurel wreath:
Laurel wreath pattern, second half:
Turn laurel wreath chart upside down. Join yarn A again and knit exactly the same wreath as the first half (including your appropriate branch tip), only going from leaf tips to stems, to create a mirror image of the first half.
Leave live stitches on your needle and pick CO stitches from provisional CO with another needle. With a third needle, BO beginning and end stitches with 3-needle bind-off, making sure the middle “stem” stitch of laurel wreath is lined up on each side.
With MC and 24-inch circular needle, pick up 3 stitches in every 4 rows along one (long) side of your band. Work applied i-cord along these stitches. Repeat with the other side of the band. Use dangling yarn ends to weave together the ends of the i-cord at the seam of the band.
Hat body
With MC and 16-inch circular needle, starting at the seam, pick up the same number of stitches along one side of band. Place a marker (pm) at the first stitch.
Round 1: k half of the stitches, pm, work to end of round.
Round 2: k to 22st before middle marker, k2tog, pm, k to 7 st before middle marker, k2tog, pm, k to middle marker, remove marker, k5, pm, ssk, k14, pm, ssk, work to end of round.
Round 3: k, slipping markers.
Round 4: k to 2 st before first marker, k2tog, sl marker, k to 2 st before second marker, kttog, sl marker, k to third marker, sl marker, ssk, k to fourth marker, ssk, work to end of round.
Repeat previous two rounds three more times.
Round 11: k to end of round, removing all markers but the one at the seam.
Knit 12 more rounds.
Before starting round 23, count your stitches. The final shaping requires a multiple of seven stitches. If you don’t have a multiple of seven, use the next round to decrease by the remainder, spacing your decreases evenly around the round (for example, if I had 73 stitches, I would decrease by three stitches now).
Round 24: divide your stitches into seven equal increments. *Knit one increment, pm, repeat from * to end of round.
Round 25 and subsequent odd rows: *k to 2 st before marker, k2tog, sl marker, repeat from *.
Round 26 and subsequent even rows: k, slipping markers.
When there are only 2 stitches left between each marker, break yarn, leaving a 6-inch tail, and use a tapestry needle to draw yarn through remaining stitches. Pull needle through to WS, pull tight to draw up stitches, and knot yarn.
Earflaps
Put hat on your head and use your finger or a pin to mark a spot about an inch behind your right ear. Using yarn C, start at this point at the seam where you picked up stitches for your bottom edge i-cord, and pick up 19 stitches, working toward the front of the hat.
Row 1 (WS): k1, p1, k1, pm, p13, pm, k1, p1, k1.
Row 2: k1, p1, k1, slip marker, k13, slip marker, k1, p1, k1.
Work three more rows as established, with seed stitch at edges and stockinette between markers.
Row 6: work seed st to marker, slip marker, k2tog, work stockinette to marker, k2tog, slip marker, work seed st to end.
Row 7: work seed stitch to marker, slip marker, work stockinette to marker, work seed st to end.
Repeat these two rows until five stitches remain.
Next row (RS): k1, s1-k2tog-psso, k1.
Next row: begin making i-cord with these three stitches. Make i-cord for about 7 inches, or until long enough to tie under chin.
Repeat this process on the other side of the hat for the left ear.
FINISHING
Weave in ends. The hat must be carefully wet-blocked to make sure that the brim does not curl up and the i-cord is all lying evenly.


 The Recipient looking very much like the D-Man himself!
 I am not Aeneas; I am not Paul... I am Bill Stephany!